OAuth 2
OAuth 2 is an industry standard protocol for authorization.
We recommend using one of the many readily available libraries for implementing the OAuth 2 flow. For testing purpose, API clients such as Postman also have built-in OAuth 2 flows.
We specifically offer the Authorization Code grant type of OAuth 2 in our REST API. This is the most common way that applications ask users for permissions to operate on their behalf.
The flow typically appears to the end-user as follows:
- They are in an application that they wish to link with Nuki
- They click on a button or a link in the application that says “Connect to Nuki” or similar
- They see the Nuki login window, and enter their username and password
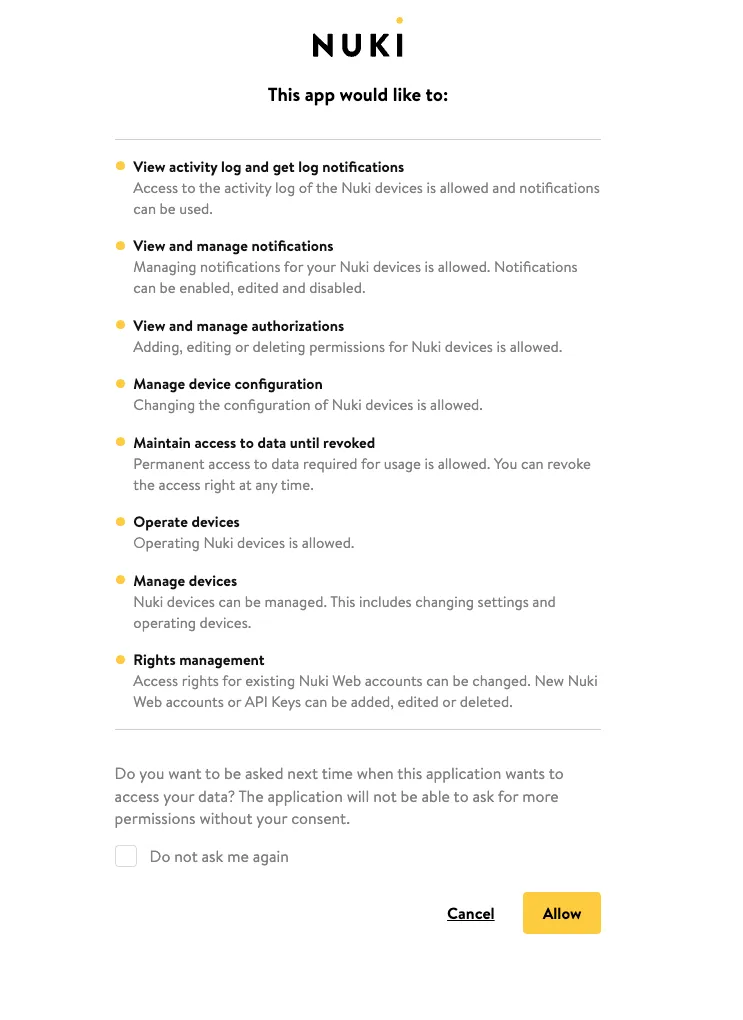
- After logging in, they see a prompt, asking them if they wish to give permission to integrate with the application
- The user clicks “Allow”, and is redirected back to the application
- They now see data related to their Nuki device in the application
Authorizing
Section titled “Authorizing”Here are the steps to follow during the OAuth 2 Flow:
Step 1: get the user’s permission
Section titled “Step 1: get the user’s permission”Implement a link, or a button, within your application that begins the authorization process. That process should trigger a GET request to https://api.nuki.io/oauth/authorize with the following parameters:
https://api.nuki.io/oauth/authorize?response_type=code&client_id=CLIENT_ID&redirect_uri=CALLBACK_URL&scope=SCOPESHere’s an explanation of those parameters:
| Parameter | Description |
|---|---|
| response_type | Leave this value as “code”. This defines that we are using the OAuth 2 Authorization Code |
| client_id | This is your Client ID string. You will find this in Nuki Web with your Advanced API credentials |
| redirect_uri | This is the Callback URL to which the users will be redirected after they authenticated with Nuki. This must match the Callback URL you have defined in Nuki Web. You can also define comma separated Callback URLs. They cannot contain wildcard characters |
| scopes | These are the permissions that you wish to request from the user. See Scopes for more details. You can add multiple scopes with a space in between; remember to URL encode these spaces |
An example request would therefore be:
https://api.nuki.io/oauth/authorize?response_type=code&client_id=v7kn_NX7vQ7VjQdXFGK43g&redirect_uri=https://test.com&scope=account smartlock smartlock.create smartlock.auth smartlock.action smartlock.log smartlock.config notificationAnd when properly encoded, it should look like this:
https://api.nuki.io/oauth/authorize?response_type=code&client_id=v7kn_NX7vQ7VjQdXFGK43g&redirect_uri=https%3A%2F%2Ftest.com&scope=account%20smartlock%20smartlock.create%20smartlock.auth%20smartlock.action%20smartlock.log%20smartlock.config%20notificationStep 2: Wait for the user to grant consent
Section titled “Step 2: Wait for the user to grant consent”Not much for you to do here other than wait.
The user will be asked to log in to their Nuki Web account, and will then see a window to grant access to your application.
Assuming the user granted permission, they will be redirected to your application via the Callback URL. We will append the authorization code as a URL parameter, in addition to the scope and state.
| Parameter | Description |
|---|---|
| code | The authorization code that you will exchange for an access token |
| scope | The scopes granted by the user |
| state | A string which helps prevent cross-site request forgery (CSRF) attacks |
Example request:
https://test.com/?code=LN6LcsYquiZG2Zbp4hqpRpbgguyFONJvDBtTvQQirSw.bz5xJmD4_SR4rzajiefv3kTlD4CfvRd55rjmwH7T7xM&scope=account+notification+smartlock+smartlock.readOnly+smartlock.action+smartlock.auth+smartlock.config+smartlock.log+offline_access&state=7eLK8cFTsqexBur4LBEFLAgMyZB5c8HjStep 3: Exchange the authorization code for an access token
Section titled “Step 3: Exchange the authorization code for an access token”You will now exchange the authorization code received in the last step for an access token.
You can do this via a POST request to https://api.nuki.io/oauth/token.
The below parameters are to be sent in the body of the request:
| Parameter | Description |
|---|---|
| client_id | This is your Client ID string. You will find this in Nuki Web with your Advanced API credentials. |
| client_secret | This is your Client Secret string. You will find this in Nuki Web with your Advanced API credentials. |
| code | The authorization code that you received in the previous step |
| redirect_uri | This is the Callback URL to which the users will be redirected after they authenticated with Nuki. This must match the Callback URL you have defined in Nuki Web |
You must also add a basic auth “Authorization” header. This is a Base64 encoded pairing of your Client ID and Client Secret.
Authorization: Basic (Base64 encoded CLIENT ID:CLIENT SECRET)Example request:
curl -X POST -H 'Authorization: Basic BASICAUTH' -d 'client_id=CLIENT_ID client_secret=CLIENT_SECRET grant_type=authorization_code code=AUTHORIZATION_CODE redirect_uri=CALLBACK_URL' https://api.nuki.io/oauth/tokenThis request will return a payload, including an access token and a refresh token.
Example response:
{ "access_token": "fCrFkSDhnXtO3YHeYog_jT6AwXxNtt3vKIDW-v9W4Go.tlN3vFYsaleGiGFbvxJdPVKqAcDPzQF36EKRqQmH8K0", "token_type": "bearer", "expires_in": 3600, "refresh_token": "RTQVsMYDk6eedwmY05_unczUIHPNxJOKsRyne4Kf_KY.RiCNJRQlv7XF4zQxk7dbwQLMlDwfTlmD-EN2bOGQzNr", "scope": "account notification smartlock smartlock.readOnly smartlock.action smartlock.auth smartlock.config smartlock.log offline_access"}Each access token and refresh token is unique to the Nuki Web account which you have received permissions to integrate with. You need to securely store these access tokens and refresh tokens for use in your integration.
Using your access token
Section titled “Using your access token”You can use this access token within the “Authorization” header of your request. The value should be “Bearer”, followed by a space, and then your bearer token.
Authorization: Bearer <BEARER_TOKEN>
Here is an example request using that bearer token:
curl --location 'https://api.nuki.io/smartlock/auth' --header 'Accept: */*' --header 'Authorization: <BEARER_TOKEN>'Refreshing your access token
Section titled “Refreshing your access token”The access token expires after one hour. You can refresh your access token via a POST request to https://api.nuki.io/oauth/token.
The below parameters are to be sent in the body of the request:
| Parameter | Description |
|---|---|
| client_id | This is your Client ID string. You will find this in Nuki Web with your Advanced API credentials. |
| client_secret | This is your Client Secret string. You will find this in Nuki Web with your Advanced API credentials |
| grant_type | Leave this value as “refresh_token”. This defines that we are refreshing an access token |
| refresh_token | This is the refresh token for the currently used access token |
Here you need to once again add a basic auth “Authorization” header. This is a Base64 encoded pairing of your Client ID and Client Secret.
Authorization: Basic (Base64 encoded CLIENT ID:CLIENT SECRET)Example request:
curl -X POST -H 'Authorization: Basic BASICAUTH' -d 'client_id=CLIENT_ID client_secret=CLIENT_SECRET grant_type=refresh_token refresh_token=REFRESH_TOKEN' https://api.nuki.io/oauth/tokenYou will receive a new access token and refresh token.
Here is an example response:
{ "access_token": "NCIrFmY4c0yRaqKLsagNtOKO11GZdb8B5qhSuGnVaQEWc.hTMpRm6bsUZBI07XMLjNPYSDz-J5_aW3sd59BTITZx1", "token_type": "bearer", "expires_in": 3600, "refresh_token": "4rtF2YVJo1CLW1mQrydksl47ZSGnY2rJbzkKBcWEjIXo.m41NMBwQleetajGfrdElw3_gnBM2ldo-VzK-B269pbW", "scope": "account notification smartlock smartlock.readOnly smartlock.action smartlock.auth smartlock.config smartlock.log offline_access"}